RESOURCES FOR ARCHAEOLOGISTS
 Anatomy of an archaeological tooth
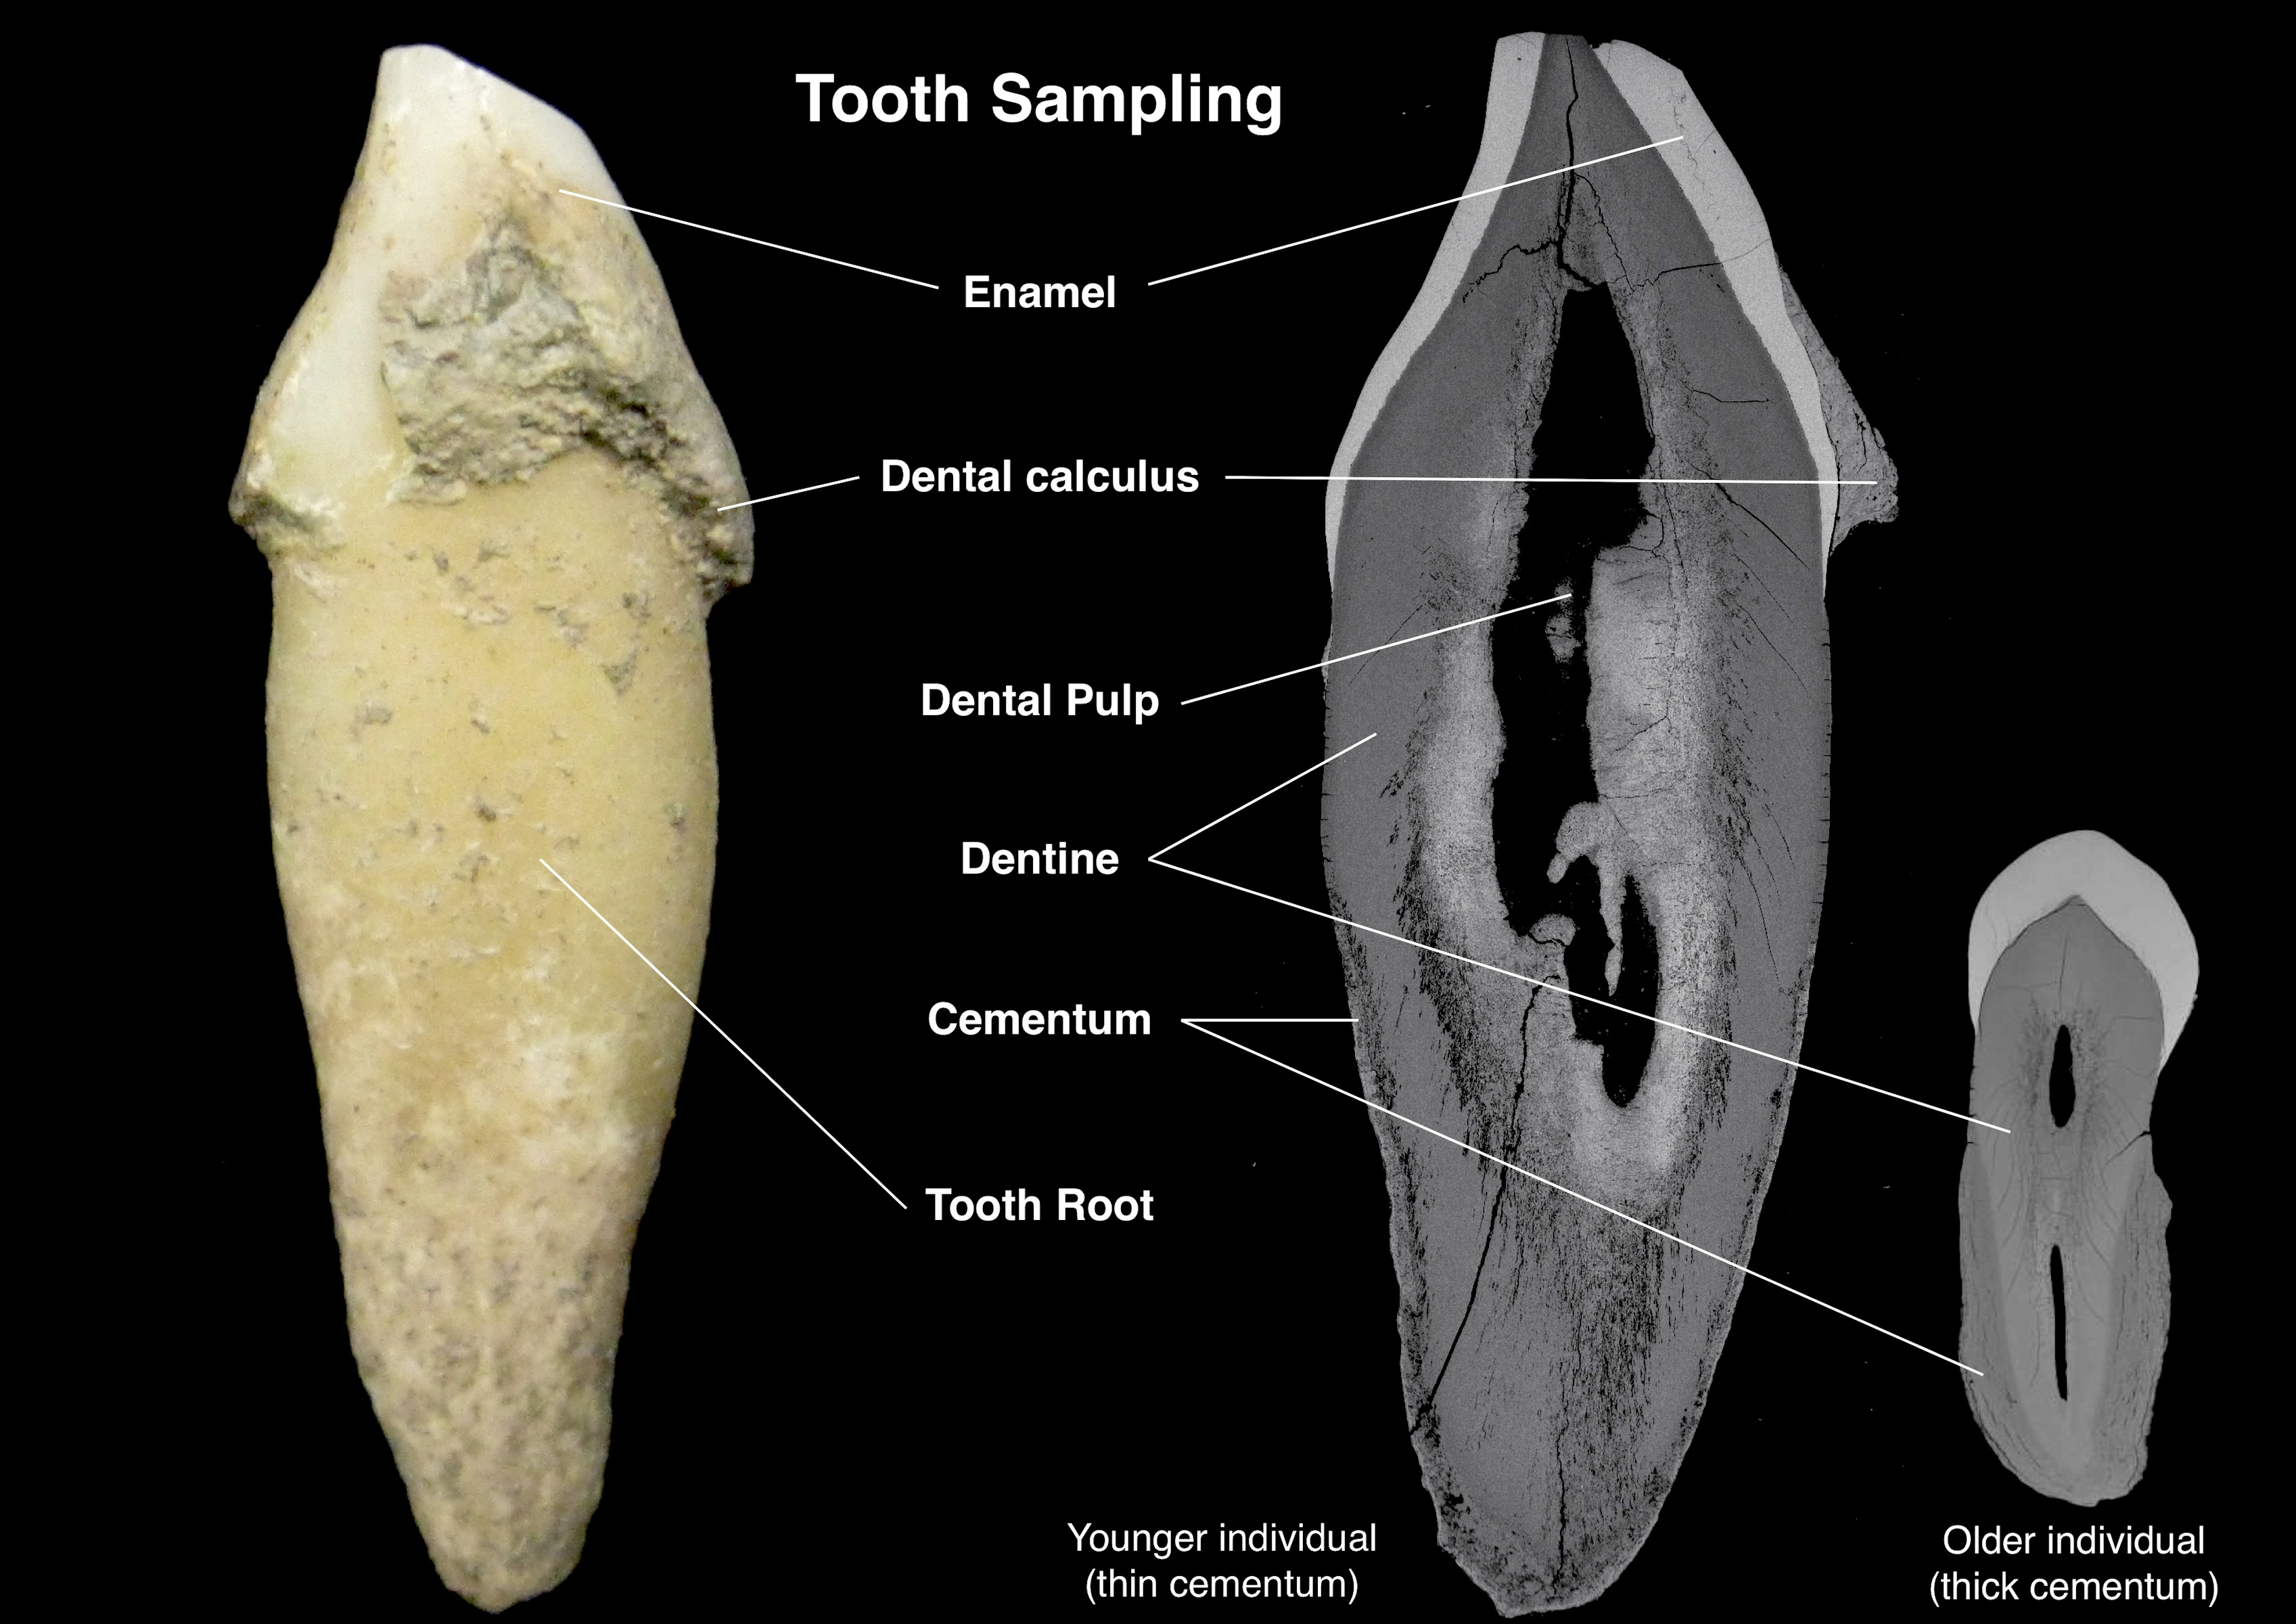
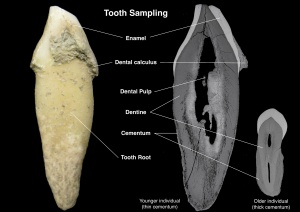
The image at right shows an archaeological incisor tooth and a cross-section of the same tooth using scanning electron microscopy (SEM) with a back-scattered electron (BSE) detector (first published in Warinner et al. 2014). Major components of the exterior tooth anatomy are indicated, including the enamel crown and tooth root. The SEM micrograph reveals additional features, such the two major tissues of the tooth root – dentine and cementum – and the dental pulp cavity. The pulp cavity, which contained dental pulp soft tissue during life, is typically fully decomposed and hollow after death, appearing black in SEM micrographs. Dental calculus is visible as a layered, mineralized accretion adhering primarily to the enamel crown (supragingival calculus) with a small amount of calculus adhering to the tooth root (subgingival calculus). Dental calculus on archaeological teeth often has a “lipped” appearance, indicating where it once abutted and grew over the gingiva. Unlike bone, teeth form once and do not remodel or grow, with the exception of cementum, a calcified living tissue on the surface of the tooth root. Cementum attaches to the periodontal ligament, which in turn anchors the tooth to the alveolar bone of the upper (maxillary) and lower (mandibular) jaw. Cementum grows continuously during life, and consequently the cementum of older individuals is thicker than the cementum of younger individuals. Unlike other dental tissues, cementum contains living cells – cementoblasts and cementocytes. Cell density is highest in the apical portion of the tooth (near the toot tip) and lowest in the coronal portion (near the crown).
Evidence of microbial and chemical damage is visible in both the light and SEM images. Teeth and other skeletal elements decompose like the rest of the body, but typically much more slowly than soft tissues, especially in non-acidic environments. To the naked eye, postmortem degradation appears as discolored spots on the tooth root, especially near the tip of the root. The SEM micrograph reveals additional degradation surrounding the pulp cavity, which includes zones of hypo- and hypermineralization, as well as microbial tunneling. Tooth cementum, which is less densely mineralized than dentine or enamel, is particularly susceptible to postmortem microbial colonization and decomposition.
Does collecting dental calculus damage the dentition?
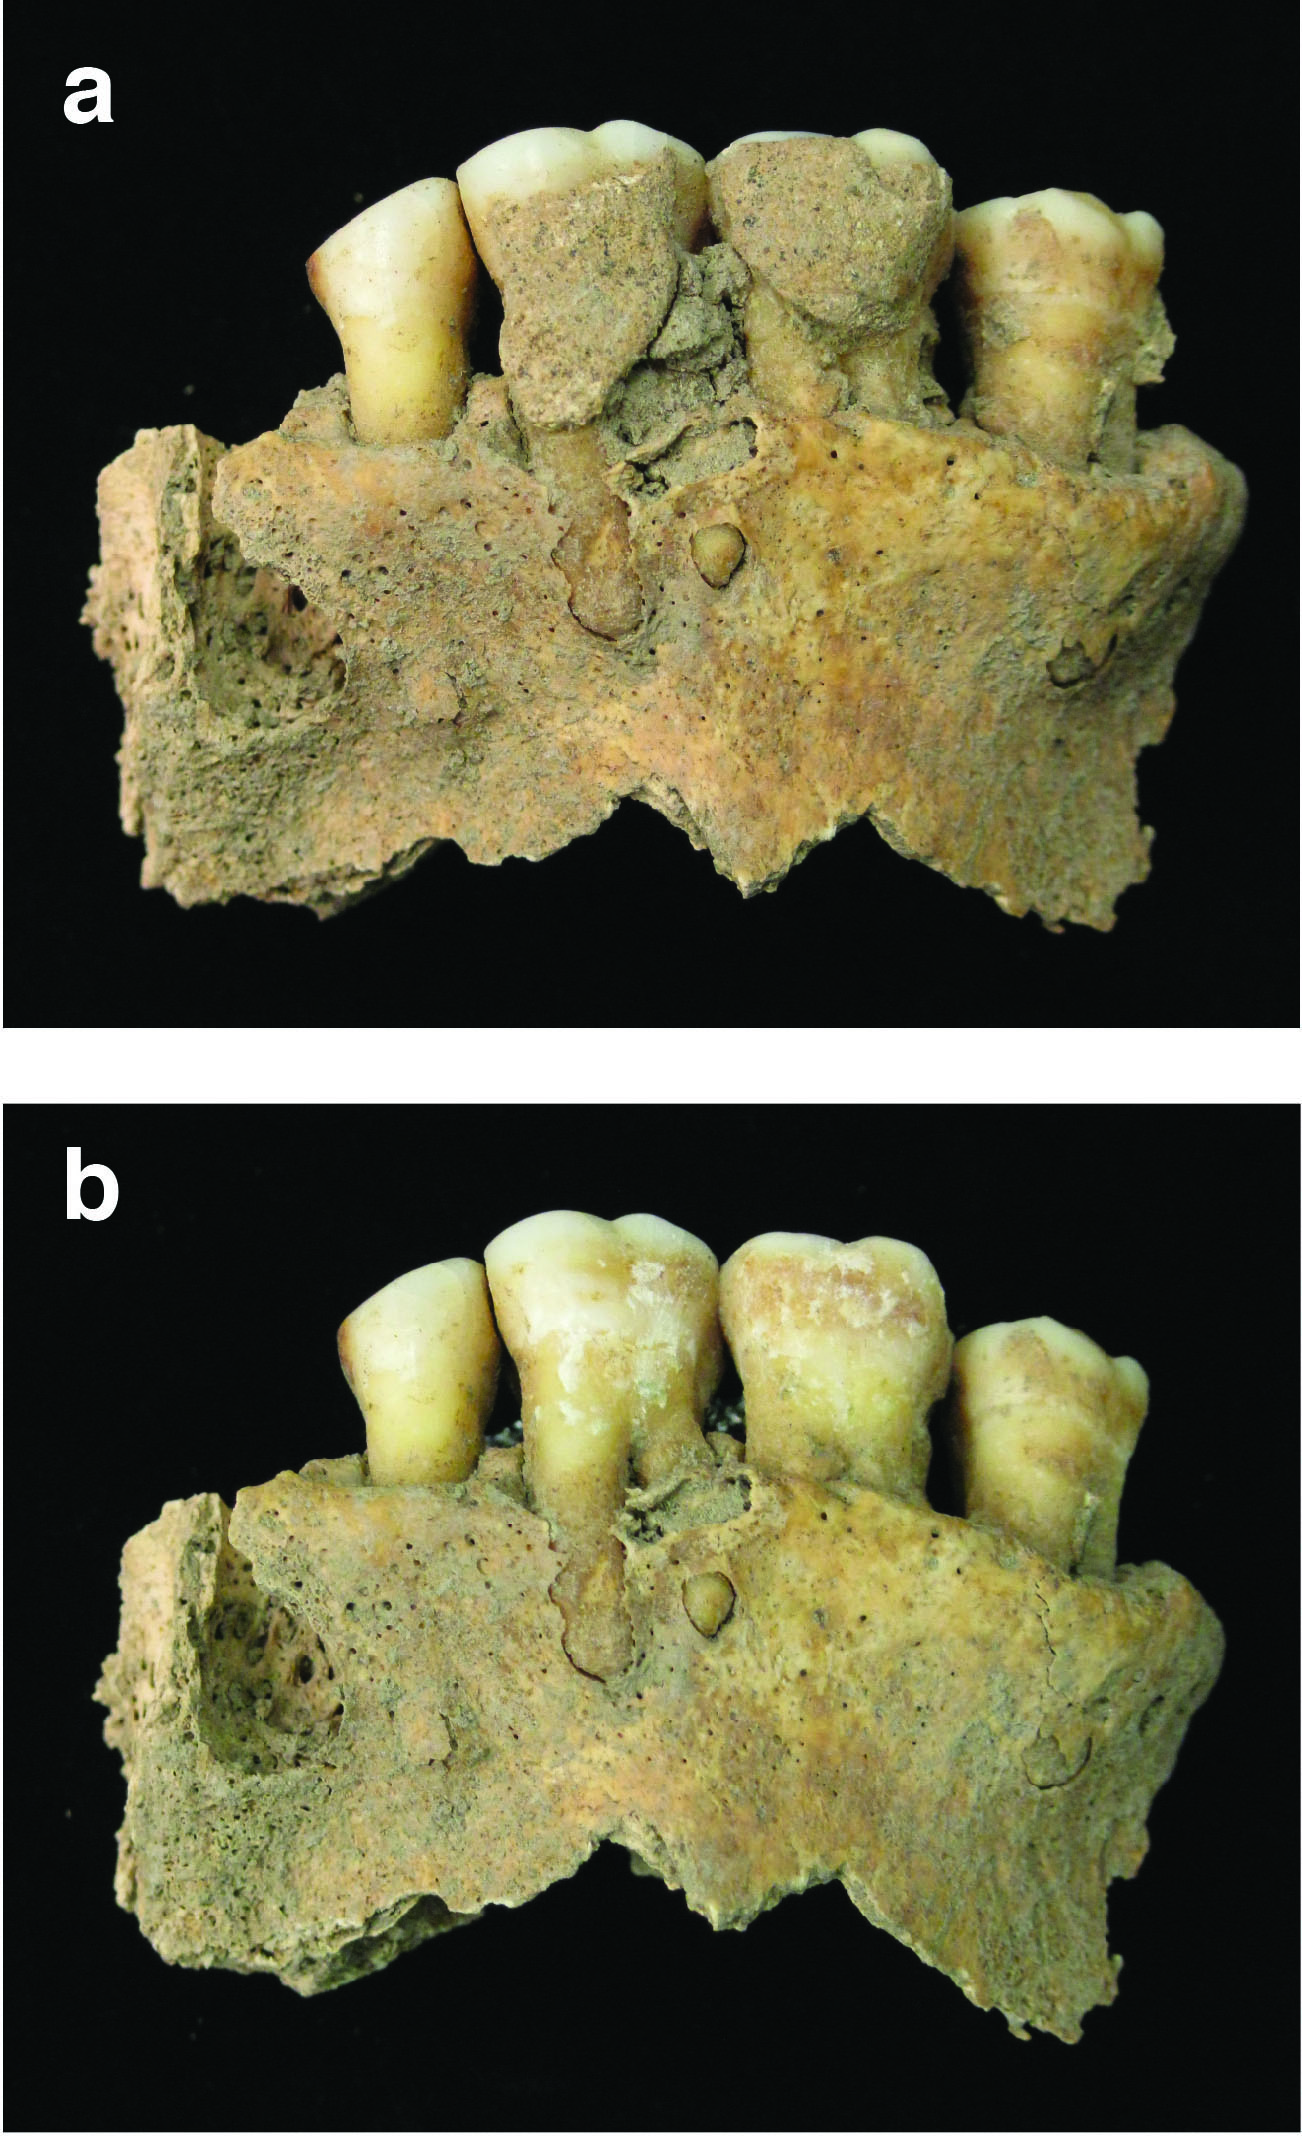 Many people ask if collecting dental calculus damages the underlying dentition. The answer is, no – when collected properly, dental calculus sampling does not harm the underlying dentition. Collecting dental calculus is a simple procedure performed using the same tools and similar techniques as professional dental hygienists. After calculus collection, teeth should appear cleaner, but otherwise not visibly altered. At left is an image of archaeological teeth (a partial maxilla) before and after dental calculus sampling (published in Velsko and Warinner 2017). You can see that dental calculus collection has not damaged the dentition, but it can reveal damage caused to the dentition during life, such as staining and demineralization.
The image at left also provides the answer to another commonly asked question – how do you distinguish dirt from calculus? In the top image, clumps of dirt are visible between the two central teeth, while dental calculus adheres to the two central teeth and far right tooth. Dental calculus and dirt are generally slightly different colors, but the easiest way to tell them apart is to lightly probe them with a dental scaler or dental pick. Calculus is made up of calcium phosphate primarily in the form of hydroxyapatite, the same mineral that makes up the inorganic portion of bone, dentine, cementum, and enamel. Calculus is hard and tough, and it generally won’t yield to slight pressure or light scratching. Dirt, by contrast, generally crumbles to a fine powder with even slight probing. If your archaeological teeth are dirty, use a dental scaler to gently remove the dirt before collecting the dental calculus.
 How to sample dental calculus

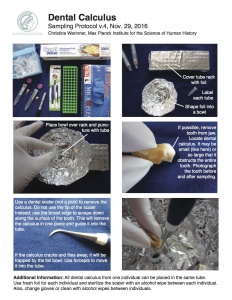
The following visual protocol (published in Velsko and Warinner 2017) guides you through the basics of dental calculus sampling. Before any sampling, We strongly recommend consultation with a dental anthropologist and/or dental calculus specialist. However, we recognise that sometimes this isn’t possible if a collection is to be reburied very soon or if another form of destructive analysis is planned on short notice. In the event of such a situation, we have produced the visual protocols at right and below that explain how to rapidly and effectively collect dental calculus in a manner that is suitable for downstream ancient biomolecule analysis. Please note that the protocol at right is most effective for the collection of dental calculus from loose teeth. The protocol below is most effective for the collection of dental calculus from intact skulls. 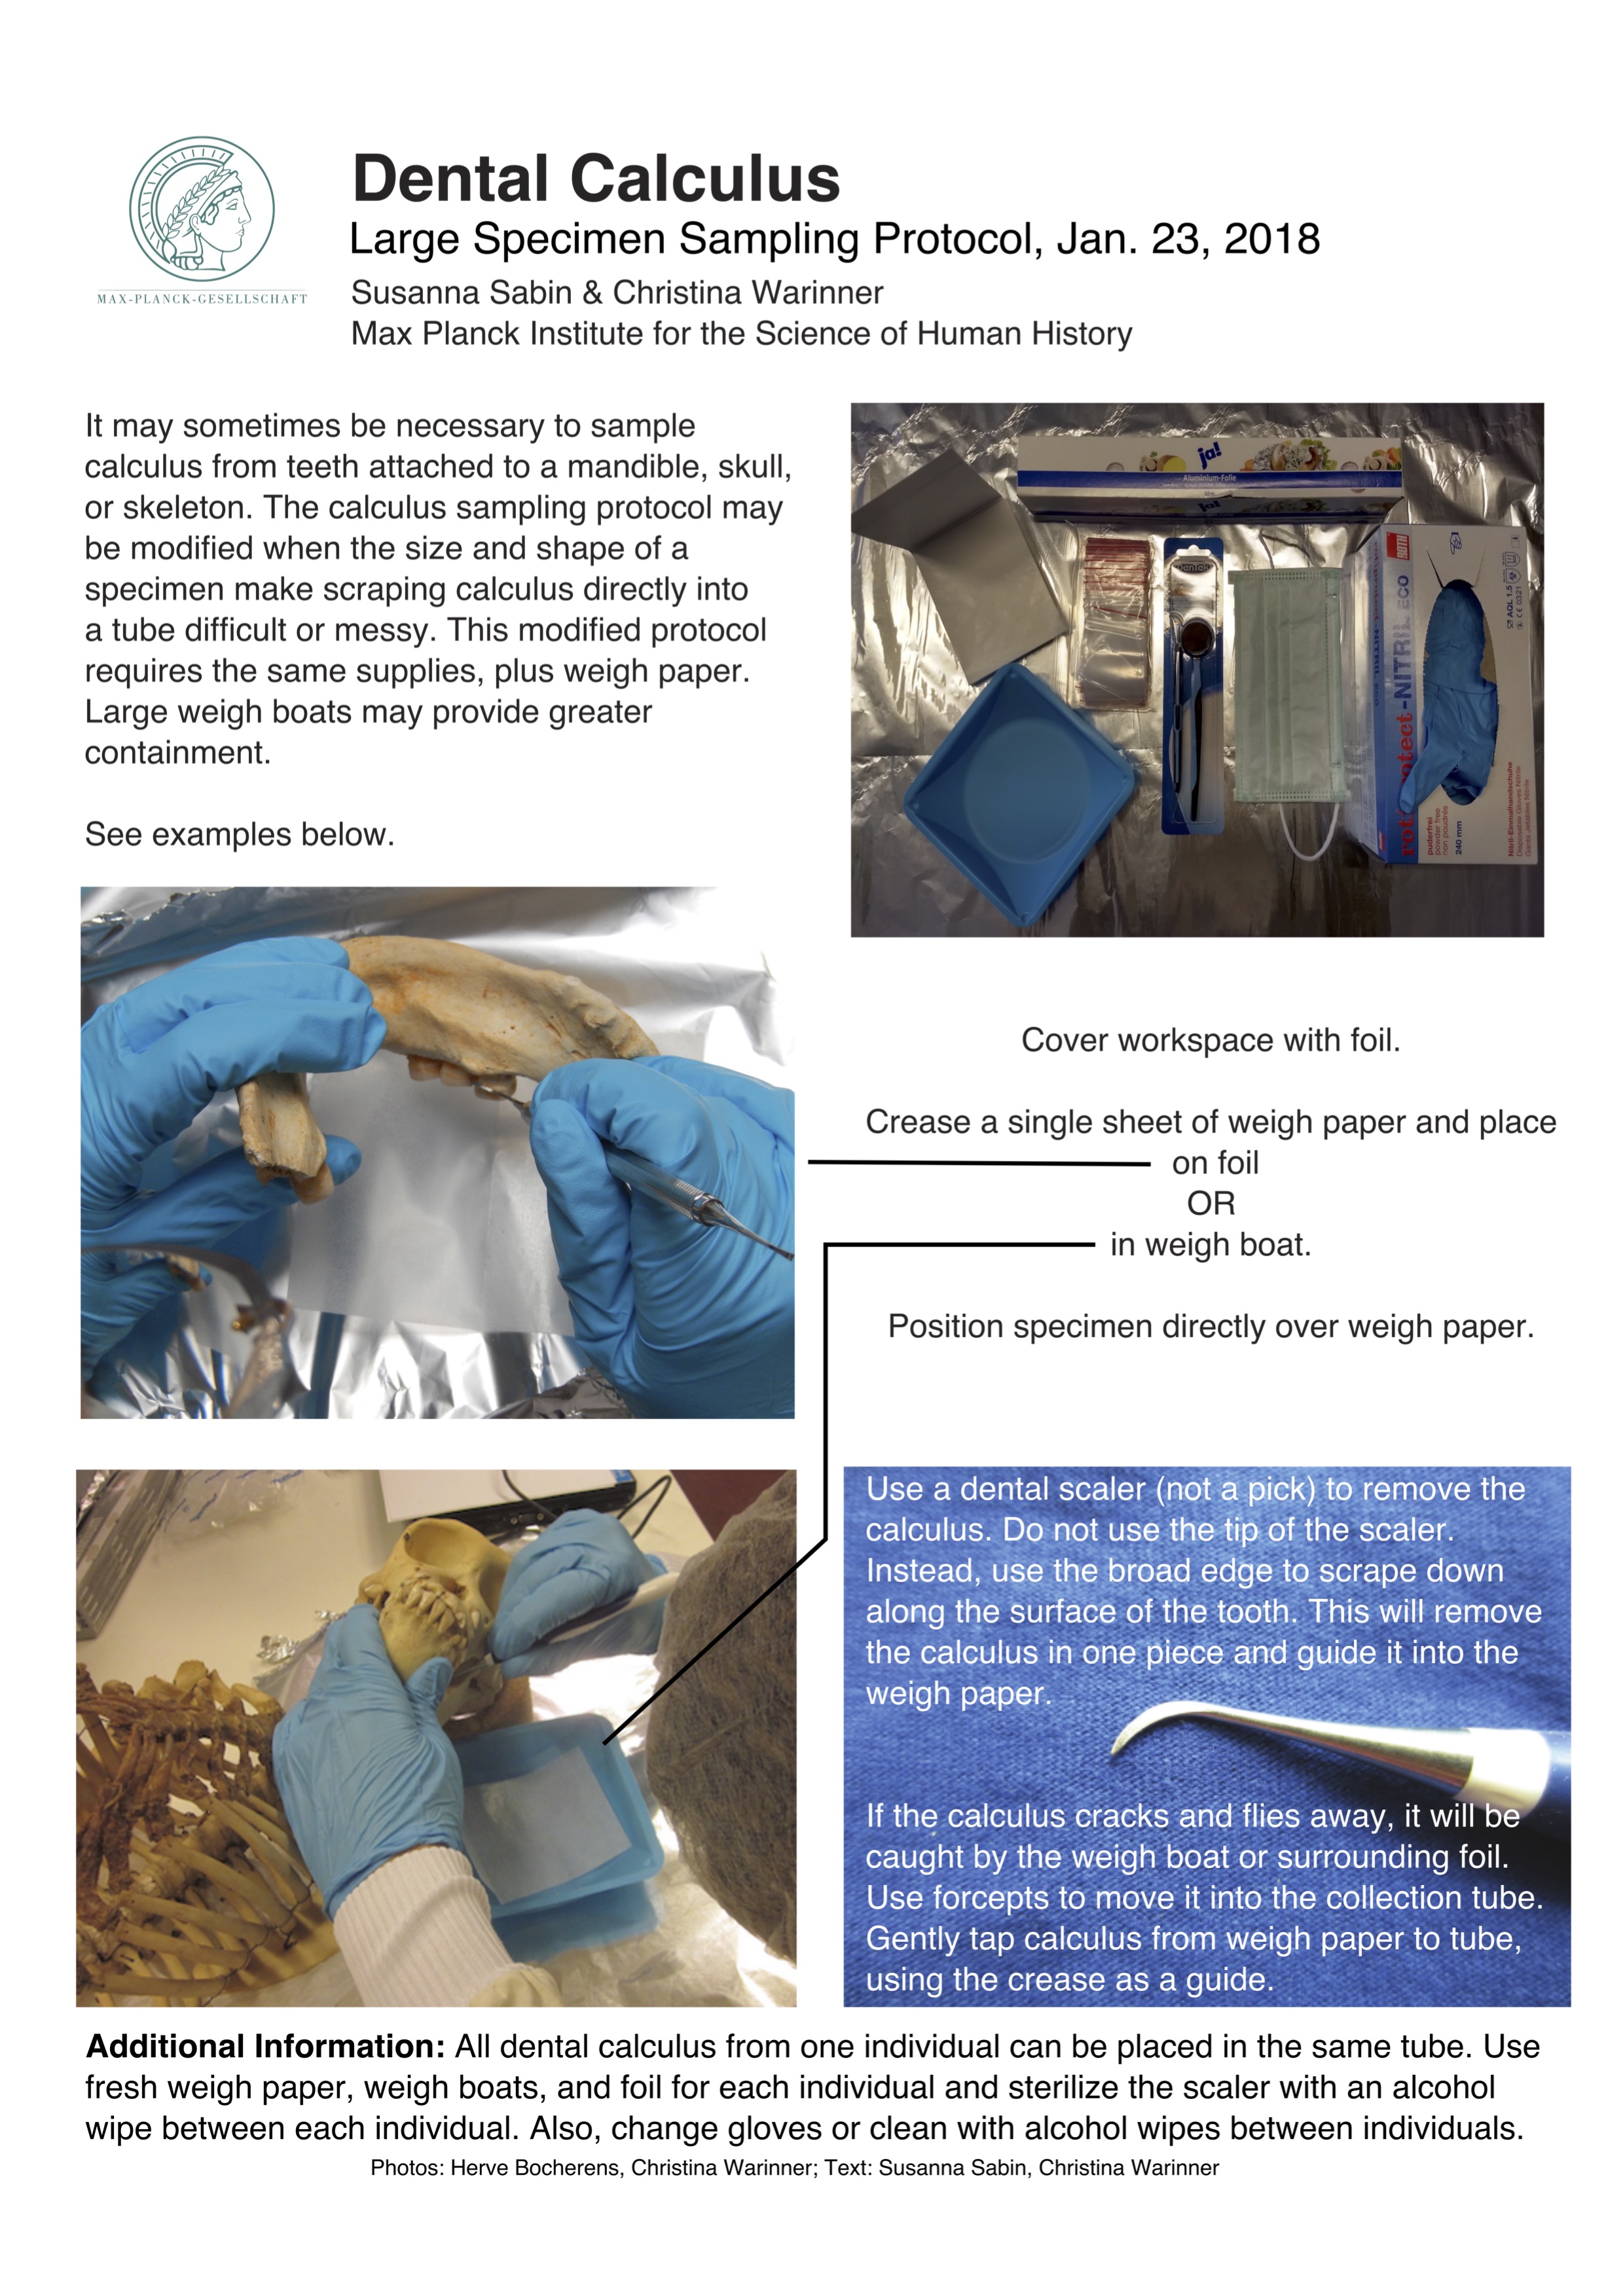 If you do not have access to appropriate dental calculus collection materials (e.g., scaler, microcentrifuge tubes, nitrile gloves, etc.), please let us know and we would be happy to send you a collection kit. Before collection, be sure to photograph the dental calculus in situ. After collection, dental calculus may be stored at room temperature in a cool, dark location. Please ensure that the dental calculus is NOT stored in a location where PCR products are generated. When mailing dental calculus samples, please do not reuse food containers as packaging.
Dental calculus weight estimation guide
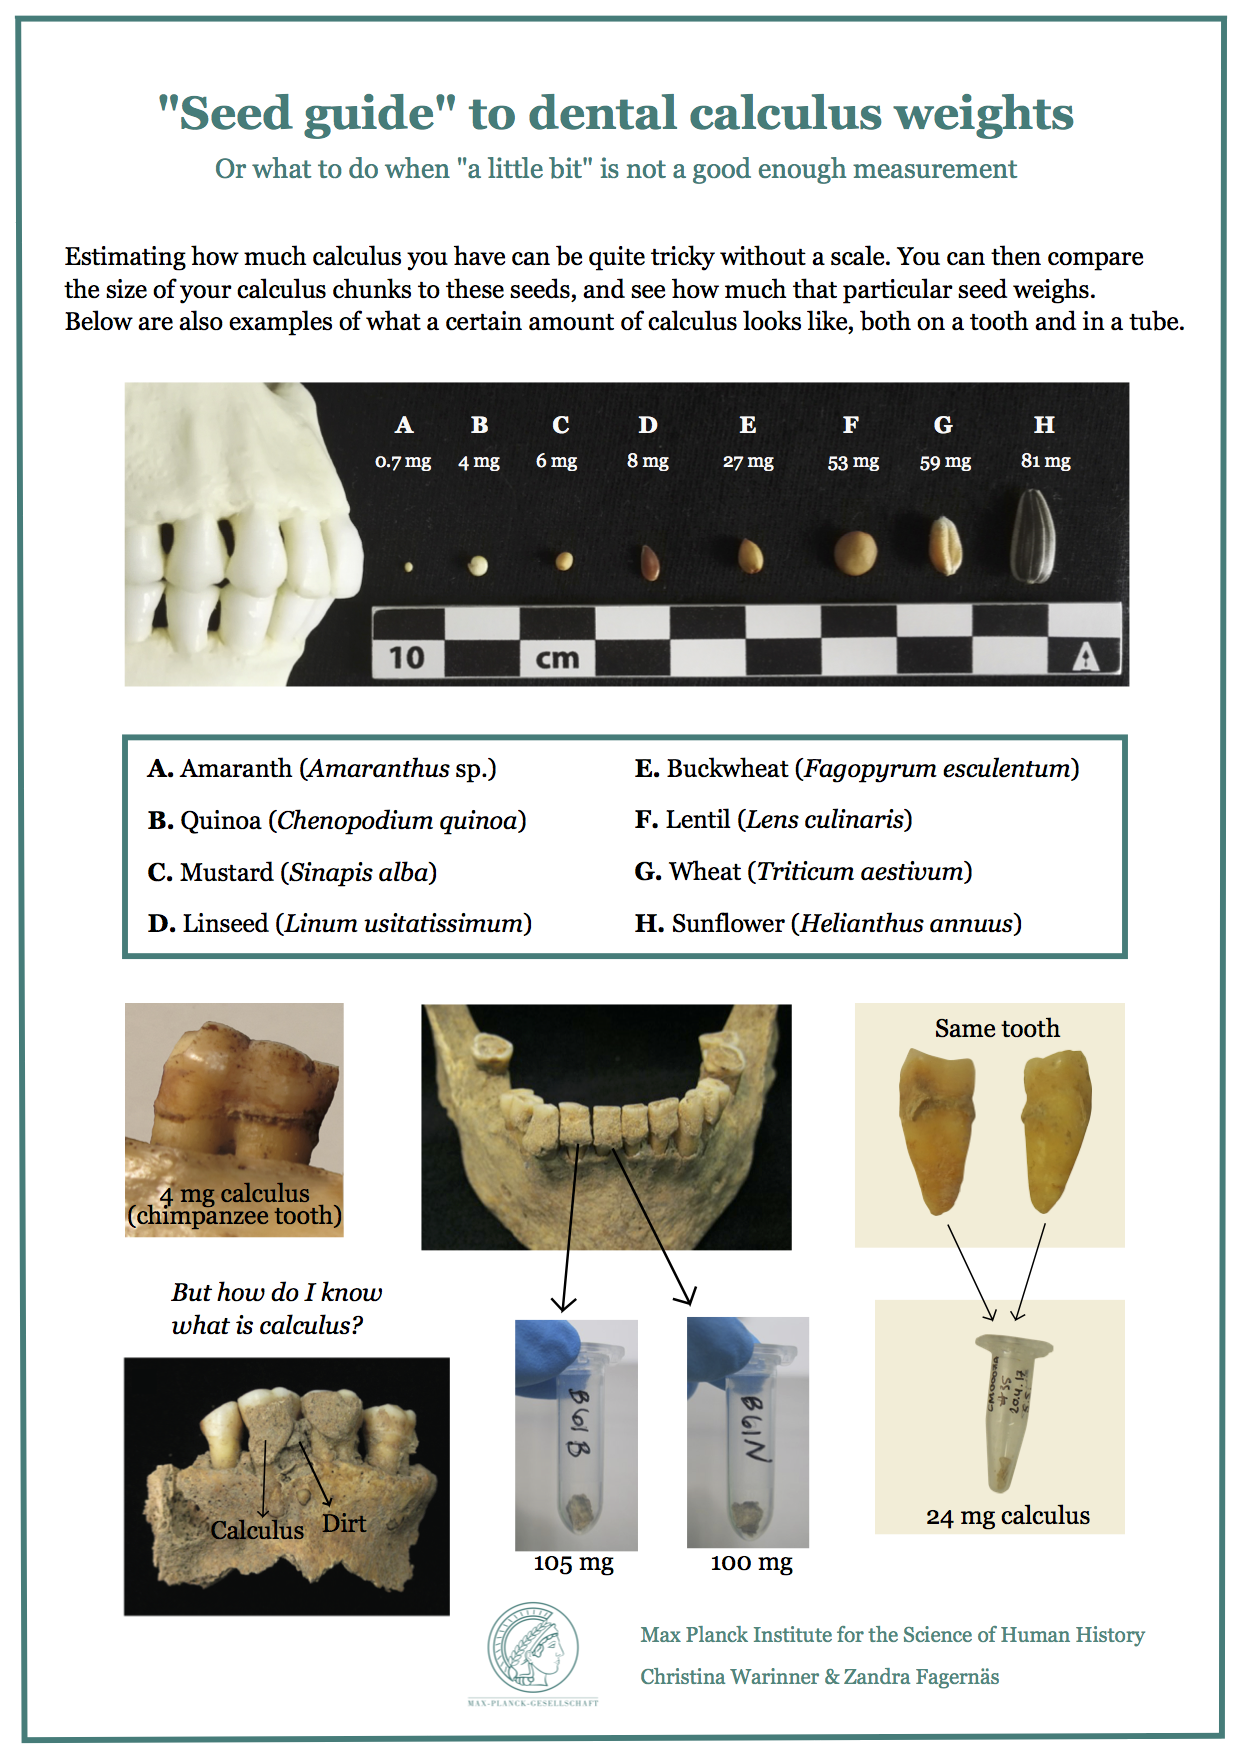 For most ancient DNA and paleoproteomic analyses a target weight of 10 mg of dental calculus is desired. But how much is 10 mg and how does one estimate this in the field where no precision digital balance is likely to be available? Luckily, MPI-SHH PhD student Zandra Fagernäs has created a field guide for estimating dental calculus weights based on size comparison to common seeds, from amaranth to sunflower seeds. Also included are photographs of real archaeological teeth and the post-collection calculus weights obtained after sampling.
Using this “seed guide,” you’ll now be able to say, “I’m sending you about 25 mg of calculus,” with confidence.
How much does a tooth weigh?
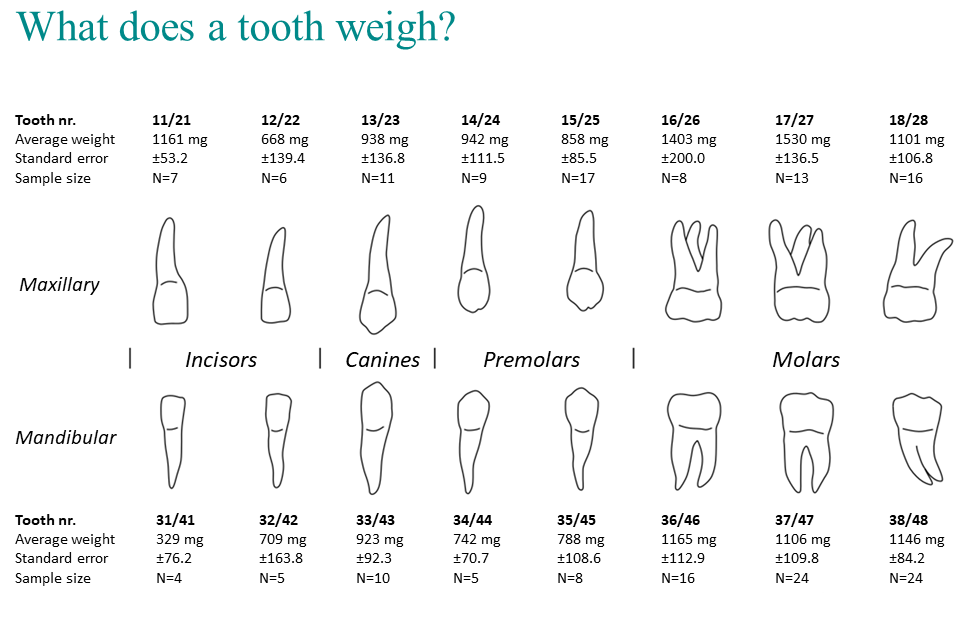 Field archaeologists and laboratory scientists tend to think in very different units, especially when it comes to weights. Field archaeologists are used to thinking in kilograms and grams, while laboratory scientists generally work with milligrams, micrograms, and even nanograms (one millionth of a gram). One area where this regularly leads to confusion is in the communication of required sample weights. For example, many ancient DNA labs require 50-100 mg of tooth dentine for human genome analysis. However, unless you know how much a tooth weighs, this can seem like a puzzling request. Luckily, MPI-SHH PhD student Zandra Fagernäs has assembled a tooth weight chart to help you know how much material you have. This chart was compiled from hundreds of measurements of archaeological teeth analyzed at the MPI-SHH paleogenomics laboratory. You’ll notice a pattern in the chart – most archaeologists and laboratory scientists choose to use mandibular molars for paleogenomic analysis because molars are the largest teeth and because mandibular molars are easier to remove than maxillary molars because they only have two tooth roots rather than three. Important: note that the chart reports total tooth weights, including both the enamel crown and tooth roots. The enamel crown, which makes up about half the weight of the tooth, contains little (if any) human DNA, so be sure to exclude this from your calculations when determining how much “useful” dental material you have for ancient DNA analysis.
 How should I label my teeth?
There are multiple acceptable numbering and labeling systems for the human dentition. It is not important which one you use, but you should be consistent and always specify which numbering system you are using. The three most common systems in use are: 1) the White system; 2) the World Dental Federation system (FDI); and 3) the Universal Numbering System (UNS). Although the White system is the perhaps the most intuitive to use, it is very difficult (or impossible) to type into most databases because it requires the use of superscripts and subscripts. Thus the simple numerical FDI and UNS systems are preferred in most cases. The FDI system is widely used internationally, while the UNS is only common in the United States and the United Kingdom. Note that many of the same numerical codes are used in the FDI and UNS systems but in referring to different teeth. It is essential when using one of these two systems to specify which system is being used. MPI-SHH PhD student Marcel Keller has put together a helpful tooth numbering chart that includes all three systems. The MPI-SHH databases encode dental information using the FDI system.
How should I collect and send teeth and dental calculus?
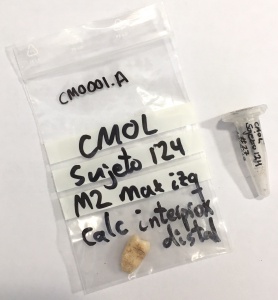 We have received archaeological teeth in many kinds of creative and inventive packaging, but we prefer to receive teeth in small plastic bags and dental calculus in micro centrifuge tubes (see photo at left). The samples should be clearly labeled with a black indelible marker (e.g., a Sharpie). Please do not use ballpoint pens or water soluble inks as these tend to fade, rub off, or tear the plastic bag during writing. For microcentrifuge tubes, 1.5 ml or 2.0 ml Eppendorf Safe-Lock tubes (shown at right) or screw-top tubes are preferred because they are less likely to open during transport. If you do not have appropriate collection materials available, please let us know and we would be happy to send you a collection kit.